
HOW TO DRAW A BRACELET
How to draw fashion accessories is one of the most asked questions related to fashion illustration. There is no doubt that choosing the right fashion accessories can improve the impact of your designs a lot. In this easy to follow tutorial, you will learn how to draw bracelets quickly and effectively and make your fashion even more glamorous!


TIME, TOOLS AND DIFFICULTY:
Time to complete the tutorial: 5 min
Tools you’ll need: drawing paper, a pencil, colored pencils, and an eraser
Difficulty level: 4/10
Step 1: Preparation
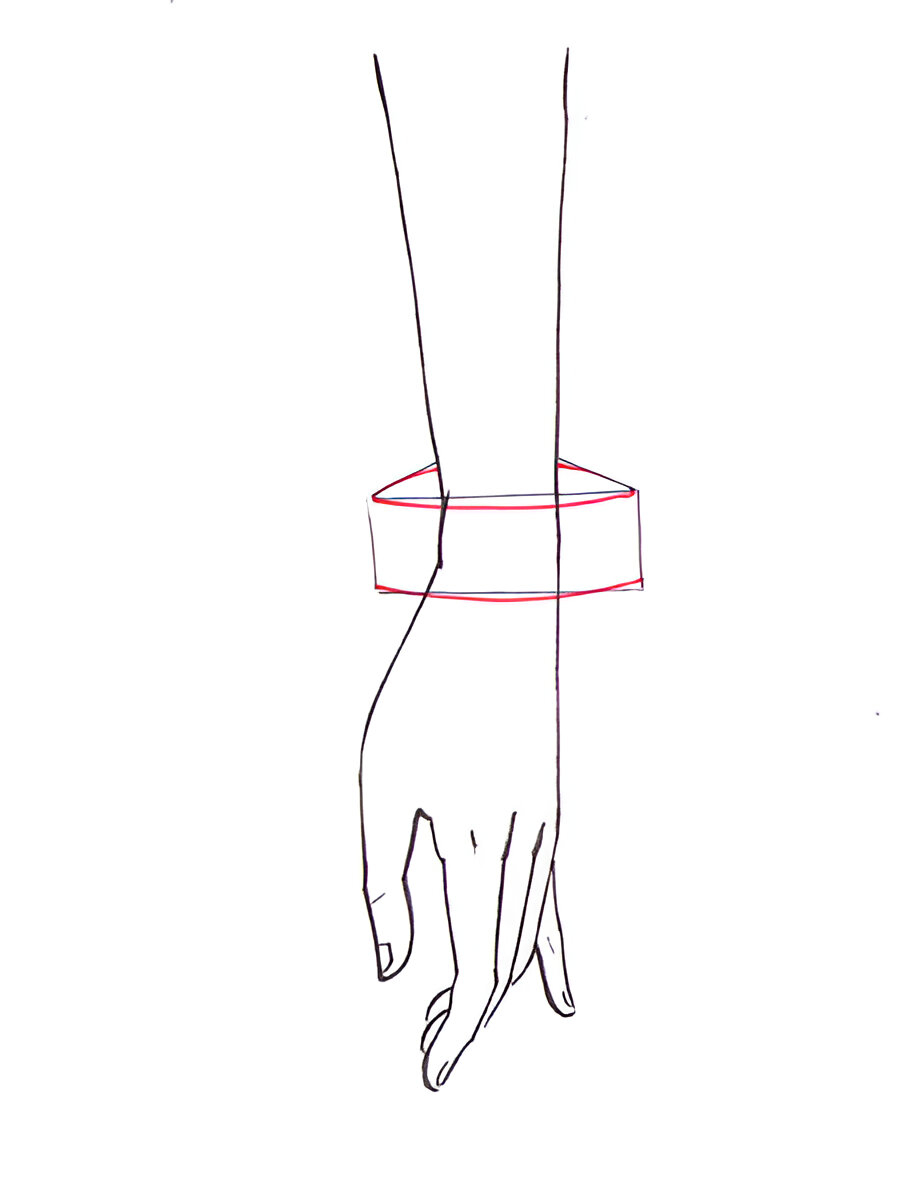
Start by drawing the arm and the hand of your model. The pose should look relaxed, yet elegant.

Step 2: Guidelines
Draw two parallel lines to mark the width of the bracelet. The bracelet could be thin or thick depending on your imagination and will.
IF IT IS NOT CUT FROM ANY OF THE SIDES, A BRACELET SHOULD BE WIDER THAN THE HAND TO BE ABLE TO PASS THROUGH IT. DON’T DRAW THA ACCESSORIES TOO CLOSE TO THE WRIST IF YOU WANT THEM TO LOOK POSSIBLE TO WEAR.

Step 3: Curving
Close the lines that mark the width to form a rectangular shape.
Draw the inclined lines as shown to form little triangles. Make sure the lines end on the same horizon behind the arm. These are added to increase the 3D effect of the accessory.

Step 4: Sofer lines
Curve the guidelines and make the transition between the rectangular shape and the triangles nice and smooth.
Step 5: Volume
Double the already curved lines of the triangles and draw the bracelet profile.
The one used for the example is a simple round bracelet, so the only thing that needs to be done is to curve the sides of the rectangle.

Step 6: Add some color
The fastest way to color the bracelet is to choose a base color, a darker shade and a lighter one.
Render the bracelet with the base color.
Then, take the darker shade and fill the triangles. As they stand behind they look darker than the rest.
Finally, take the lightest color and fill the center part of the accessory with it. Blend it well.
You could add a little light reflection in one of the sides of the bracelet to help to create the illusion of wrapping around the arm. Less is more, in this case, so use the light wisely.

Bracelet variations:
There are endless variations of bracelet profiles and forms. Here are some of them:

1)To make a detail part of the bracelet surface when you reach the side end don’t draw it all. Make just half of it and the viewer’s eye will automatically make it go around the corner.
2)If you want to make the detail stand out from the bracelet surface you should draw the whole form ( the first half inside the bracelet and the second half-outside the rectangular shape)
3) Drawing rectangles with an X mark inside and leaving just a triangle, in the end, will give you that bad rocker girl look.
4) Remember to make the stripes parallel with the bracelet outline. This means curved like it.
5) A bracelet is nor always necessary round. The profile may change, but the curved triangles used to gain dimension stay the way that they are.
6) A bracelet made of beads.
7) and 8) Variations of profiles
9)You can add different borders to the bracelet as well.
10) A spiky one.
11) The favorite snake bracelet. This accessory is drawn after the same logic as described above in the tutorial. Just the guidelines are thinner and inclined.
Some advices
. More bracelets:
When drawing more than one fashion accessories give them the feeling of air and movement. Don’t make them all perfectly aligned. Note how the lines that go out of the arm are not equal from both sides.

. Hand on waist
Take a closer look at the image and see how every bracelet has it’s own moment. The ones closer to the wrist are almost straight. because of the gravity, the upper triangles in each bracelet is smaller than the lower.

. Hands up:
When the hands are up the bracelets are falling in a specific way. The ones closer to the wrist are the most inclined. Note how the guidelines are moving and changing.

I hope this tutorial was useful for you and your fashion designs will have new fabulous accessories from now on.
Happy drawing!

LATEST POST