
HOW TO DRAW A FLORAL PRINT
In this tutorial, you will find an easy to do the way of drawing floral prints. Actually it is a technique that could be applied to any kind of prints and make your fashion sketches even better looking. Follow the steps and have fun!


Step 1: Draw a floral print basics
Before you start you need to draw with clean lines the clothes that are about to get your print design. Make sure you have all the details carefully drawn and all the unnecessary lines- erased. A helpful tutorial if you’d like to draw ruffles is “How to Draw Ruffles step by step“

Step 2: The secret of drawing floral prints
The most essential thing about drawing any kind of pattern is to remember that clothes are not flat. If the fabric is distorted in any way, so will be its print too.
In the example illustration, I have marked with red the folds that stand out closer to the viewer.
QUICK TECHNIQUE TO UNDERSTAND WHICH PART OF THE RUFFLES OR FOLDS IS CLOSER TO YOU: TRY TO CLOSE YOUR EYES AND THINK OF THE CLOTHES AS IF THEY WERE MADE OF CLAY.
WHEN DRAWING PRINTS ALWAYS HAVE IN MIND THAT THE PATTERN WILL GET TRANSFORM ACCORDING TO THE VOLUME OF THE CLOTHES. SO THINK IN ADVANCE FOR THE VOLUME AND THE FOLDS YOU HAVE.

Step 3: The folds Distortion Rule
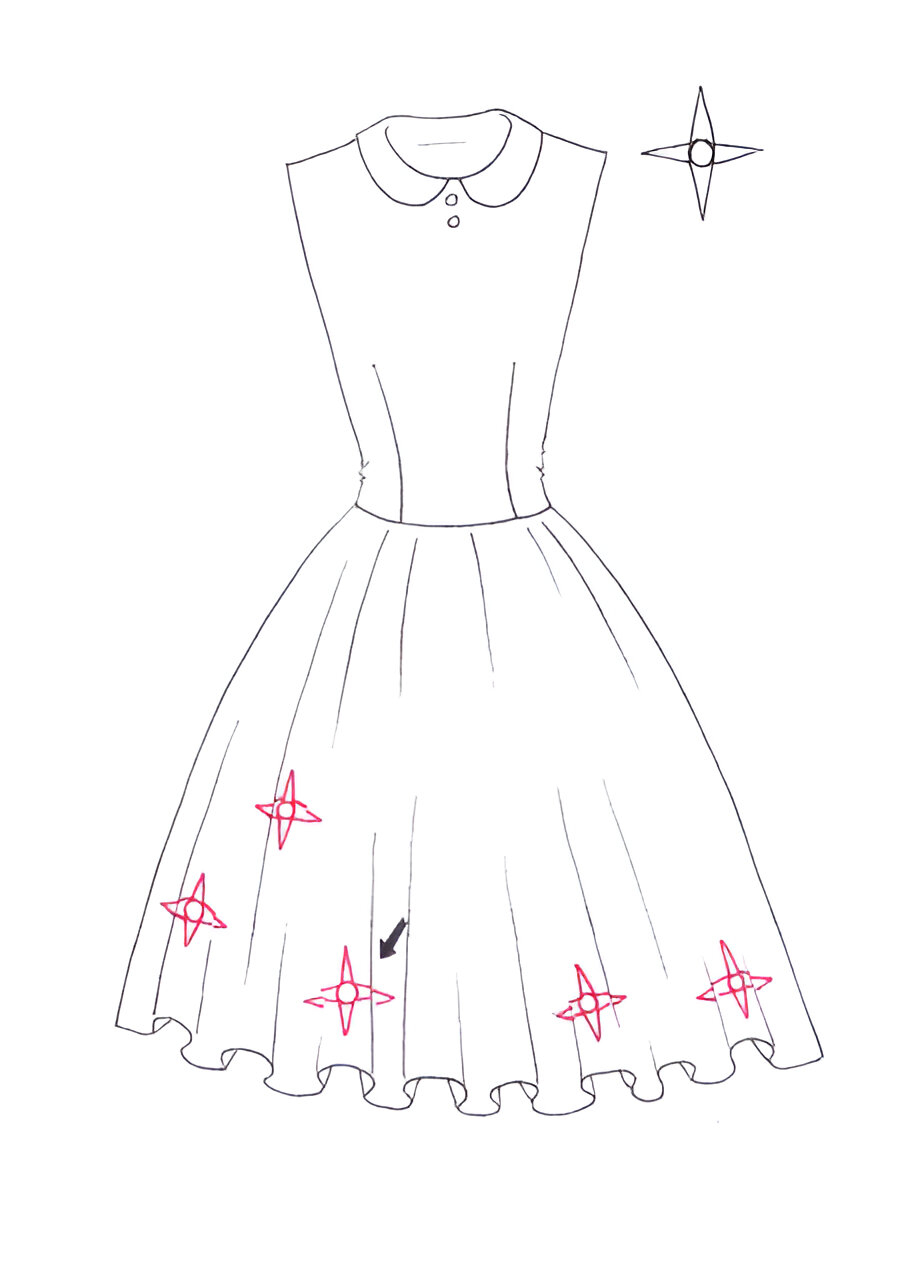
To make sure that all the flowers are the same size and are evenly spread over the fabric, simplify their form and start filling the surface of the dress.
Notice how their shape gets distorted because of the volume of the folds. Don’t just draw the pattern, but think of the volumes you identified in the previous step.
When the print is passing through a red shaded area it moves slightly up!
THE DEEPEST THE FOLDS ARE, THE MORE DISTORTED THE PATTERN GETS.
Step 4: Fill in
Fill the rest of the dress surface with the print. Note that sometimes the center of the flower will happen to be in the deepest part of a fold. In this situation, you will move the tips of the florets slightly up, as they intersect with the Red shaded areas.

Step 5: Edges
Draw flowers that are at the outline of the dress. Cut them in half or in other creative ways to show that they are wrapping around the body. Keep following the Folds distortion rule when you pass through Red shaded areas.

Step 6: Floral patterns
Once you have set the number, size, and interaction with folds of your flower design it is time to draw it with more details. Don’t forget about your previous work here – follow closely the flower guidelines with all their distortions.

Step 7: Add details
Finish all the details of your flower print. Add leaves, sparkles or whatever you like to make it look beautiful. Use your imagination, be creative!

Step 8: Color it!
It is time to fill your fashion design with fun, vibrant spring colors or tender muted tones. Pick shades that will bring out the best of your design.

Step 9: Add some shadows
The most important thing when adding shadows to your design is to darken the flower pattern as well as the background. The shadows will go to the deepest parts of folds (that were NOT shaded in red areas).

These were the basics of drawing prints for your fashion sketches. If you liked it you can next check out this ‘How to draw a Summer dress‘ tutorial to exercise your new learned skills. Wish you all the best and don’t forget to have fun while creating beautiful new designs!
Happy drawing!

LATEST POST