
HOW TO DRAW A PROFILE
Learning how to draw profile faces for your fashion sketches and illustrations will give you more options in designing your new collections. An interesting model poses is one of the things that makes fashion designs look better. So understanding how to draw the profile is very helpful. Enough talking let’s start this step by step tutorial and have some fun!


Step 1: Draw the profile guidelines
Start with drawing two overlapping circles one above the other, as in the “How to draw fashion face” tutorial. Their centers should touch the outline of the other circle. Right next to the upper circle draw the third one. All three shapes should have the same size in order to get good results with your profile drawing.
THESE GUIDELINE CIRCLES ARE VERY IMPORTANT AND YOU ARE GOING TO NEED THEM UNTIL THE VERY END OF THE TUTORIAL, SO MAKE SURE EVERYTHING IS EXACTLY AS IN THE EXAMPLE ILLUSTRATION.

Step 2: Add curves
Using smooth curves connect the gap between the circles as shown. These will be the Front profile curve and the Top head curve.

Step 3: Eyes and nose
Draw a short horizontal line from the point where the first two circles overlap. This is where the eye is going to be placed.
From the Center point of the bottom circle, draw a horizontal line crossing the Front profile curve. Make a small circle lying on this horizontal line. This will be the nose tip.
Mark another line above the Eye line. This is the Eyebrow line. The distance between those two lines is about the same as the nose tip diameter.

Step 4: Draw the profile nose
Follow the Front profile curve and draw the forehead until you reach the Eyebrows line. When you reach it – go in, until you reach the Eye line level. The Direction of this short line should be parallel to the big guideline circle next to it.
Draw the nose of your model. Notice that the nose ends in the middle of the nose tip, don’t go any further.

Step 5: Nostrils
Draw inclined line touching the bottom circle and right above it put the nostril.
In order to draw the nostril like shown in the example illustration, turn the sheet and make a regular question mark, without its point.
Notice that the nostril touches the bottom circle too.

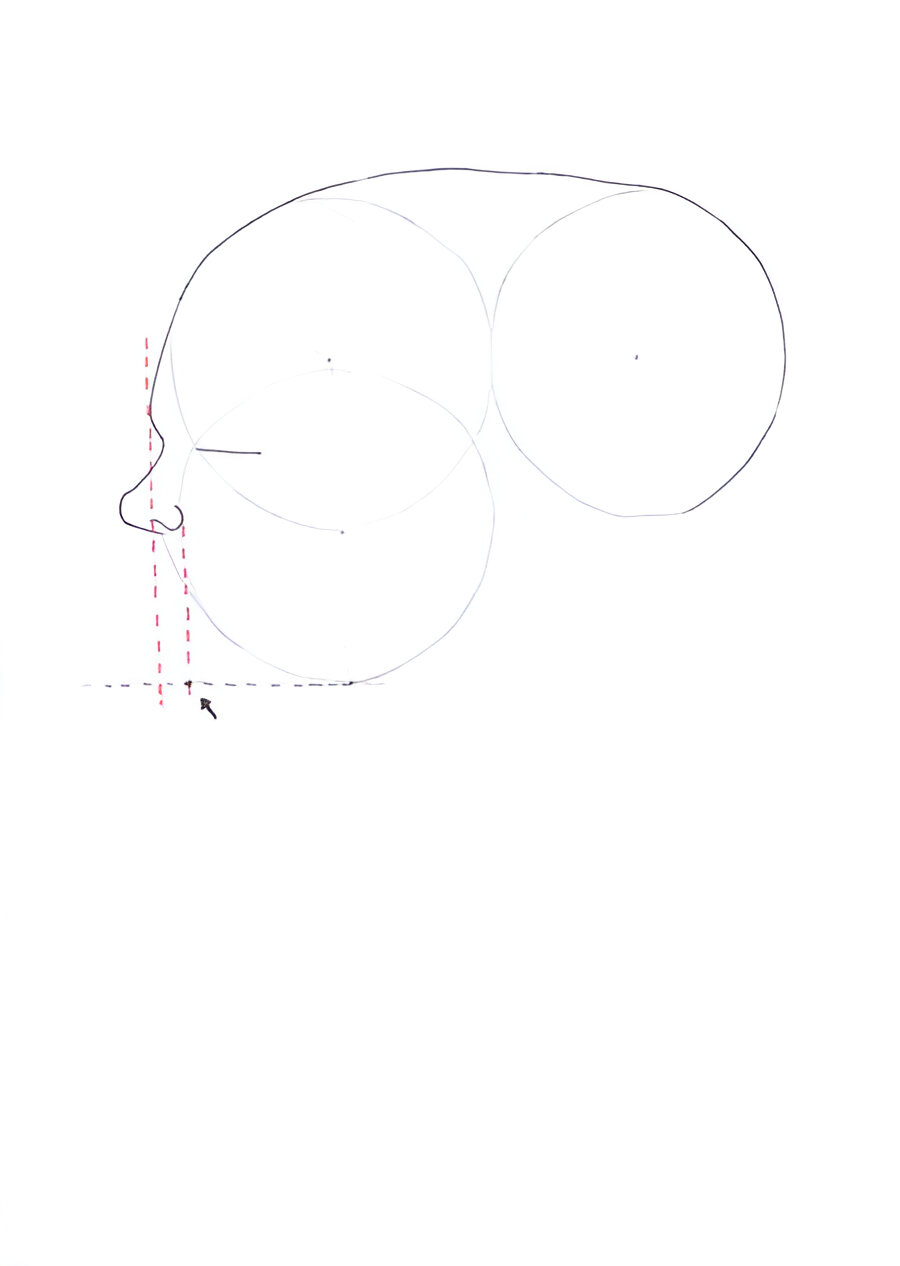
Step 6: More guidelines
Pull vertical guidelines from the most bulged part of the forehead and the end of the nostril.
Draw a horizontal guideline from the bottom-most point of the bottom circle.
The point where the latter is crossed by the nostril line will be the end of the chin.
Step 7: Measurements
Connect the nose tip with the Chin point (2). The place where this slant line crosses the Forehead guideline is where we will have the Mouth centerline(1). Point (3) indicates the jawline. The Jawline point is on the horizontal level of the Mouth centerline and touches the guideline circle from the other side.

Step 8: Draw the mouth
Start drawing the upper lip with an “S”- like curve between the nose and the mouth centerline. Make sure that at least half of this curve is following the incline of the nose tip-chin line.
Draw a little circle below the mouth centerline point to indicate the lower lip. This little circle should fill the gap between the nose tip-chin line and the nostril line.

Step 9: Finish the mouth
Draw a beautiful smooth curve to finish the upper lip and just hint gently the lower lip.
THE RULE OF THUMB IS TO LINE UP THE MOUTH CORNER WITH WHERE THE EYE BEGINS.
Join the Jawline with the center of the circle as shown in the example illustration. This will show you what the incline of the ear should be.

Step 10: Chin and Jaw
Finish the chin where the chin point was. Notice that just below the mouth the chin slopes in, then it turns back in an angle (not a curve!) and then you continue with a smooth curve to finish the chin.
Continue drawing the jawline. Look how the female jawline is not straight horizontal, but inclined, going towards the Jaw point, where it turns up and reaches the nose level.
From the nose level up mark where the ear of your fashion sketch will be. The ear should be no higher than the Eyebrow line level, or it will look too big.

Step 11: Draw the eye
Profile eyes are different from front view face eyes. See the mini-steps and place the eye on the Eye line. The size should be about the same at the visible part of the mouth.
Draw the details of the ear and the cheekbone. The cheekbone will follow the curve of the initial big circles’ guidelines.

Step 12: Head and neck
When drawing a profile face you need to have in mind the form of the skull too. It is not enough to draw the features of your model only. Cut about ¼ of the side guideline Circle and outline the skull.
Draw the eyebrows, pulling guidelines from the nostril towards the beginning and the end of the eye.
Lastly, draw the neck of your profile fashion face. Notice that the neck begins after the bottom-most part of the initial guidelines circles.
NOTICE THAT THE NECK IS COMING DOWN AS A SLANT. PLEASE DON’T DRAW IT AS TWO VERTICAL LINES.

Step 13: Draw the hair
Draw a hairstyle to suit the attitude and outfit of your fashion sketch. Make sure you have drawn the hairline correctly and enjoy your work.

Now you know how to draw the profile view of the face and you have so many more options for your fashion sketches. Check out also the tutorial “How to draw 3/4 view face” to gain more options and my online course “How To Draw Faces” where there are step-by-step tutorials on every possible view angle. Play with poses, haircuts and face expressions. Everything is in your hands now!
Happy drawing!

LATEST POST