
HOW TO DRAW A BAG
Drawing the proper fashion accessories will bring life and style to your designs. Always make sure that you think of the best possible presentation of the clothes you are creating – draw bags, gloves and fashion hats, draw bracelets and jewelry to make them your designs more appealing. Designing a beautiful and interesting bag is your task as a designer, but in this step by step tutorial, you will learn some basic fundamentals to start from. Enjoy!


Step 1: Bag outlines
Decide on the proportions in height and width that you like and draw a rectangular shape to mark the body of the bag. Draw a vertical line in the middle of the rectangle. This is the Centerline.

Step 2: Perspective
Take care of perspective In this example, the bag is slightly turned to the left. This means that we are seeing it in ¾ view: its front and its right side. Move the Centerline to the left and mark a buckle in the middle of the line. Distort the straight lines of the sides to make the illustration look less stiff and more like a real bag. Notice the form (a curvy lines triangle) on the very right side of the bag. That’s the side view.
FOR BEST PRESENTATION OF A BAG DESIGN DRAW AT LEAST 2 OF ITS SIDES VISIBLE. THIS WILL ALSO GIVE YOU MORE SPACE TO INCLUDE CREATIVE DETAILS IN THE DESIGN.

IF YOU DRAW THE SIDE VIEW (WAVY LINES TRIANGLE) IN THE LEFT, THE CENTERLINE IS PUSHED TO THE RIGHT. IF YOU DRAW THE SIDE VIEW FROM THE RIGHT, THE CENTERLINE IS BEING PUSHED TO THE LEFT.
Step 3: Add some sexy details
Following the same logic draw pockets to the bag. Make sure that they are in the same perspective plan as the body. Always put the side plan only to the right or only to the left. See how the bottom of the pockets is a bit lower from the bag body bottom. Do this to add an extra dimension to your drawing.

Step 4: Draw the chain base
Draw holders in the top corners of the bag and mark overlapping circles from one side to the other. This is the base for the chain, that will serve as a trap of the bag. The strap should be long enough to pass through the shoulder – watch for it. Don’t do the mistake to draw the circles too small – this will take you a lot of time to finish the next step.
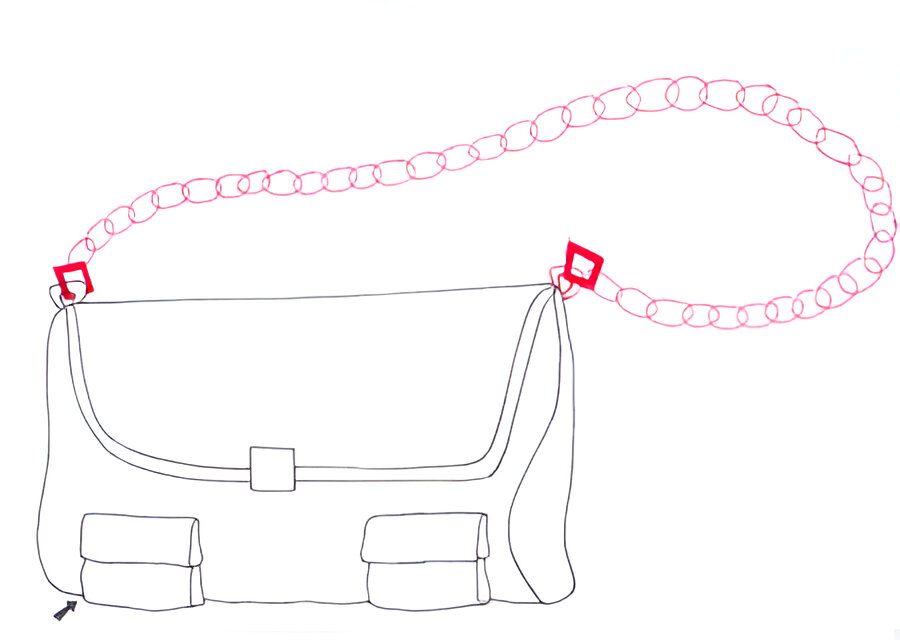
Step 5: Finish the chain
To draw a realistic chain you need to take a few steps. First, draw smaller circles in those you already have drawn. They represent the hole (negative space) of each chain link. Erase the lower left part of the upper link. Only where it intersects with the bottom one. Erase the upper right part of the lower link. Only where it intersects with the upper one. Repeat for all the links you have drawn and add interesting details to the bag. For more detailed instructions on how to draw the chain check the “How to draw chains” tutorial

Step 6: Final design details
For closing, elements check out the “How to draw a belt” tutorial.

Many times just knowing how to draw a bag or a purse is just not enough. You have a model that will be holding the bag and this should be drawn nicely. See some of the possible hand positions to hold a bag. Exercise until you draw them perfectly and make sure you check the “How to draw hands” tutorial first.
Have fun and create your own fun and playful or elegant and classy bag designs!
Happy drawing!

LATEST POST